Here are some brief notes from the article I'm reading:
- "Trigger": the this in if this, then that; invokes the action
- "Action": the that in if this, then that; invoked by a trigger
- "Recipe": a trigger and its correspond action
- "Channel": a web service or connected device that will be used in a particular recipe
I opted to not complete the tutorial in the second half of the article, as I'm interested in building a location-based recipe with the goal of sending my partner a text message whenever I leave school. I'll follow this tutorial to learn how to create such a recipe.
After reading the sections on geofencing, installing the app, and exploring existing location-based recipes, I realized that the article is over 2 years old at the time of this writing. As a result, the in-app navigation instructions are outdated, as well as their claim that "there’s no way to craft a recipe through the IFTTT mobile app". In today's version of the app, there actually is a very simple way to create a recipe. At this point, I stopped following the tutorial and instead explored the app on my own for a while. Here are the steps I took to create my custom recipe on my iPhone (the Android process is likely similar):
1. Download the IFTTT app from the App Store and create an account, if not already done.
2. Go to the "Search" tab and search for "location".
3. Scroll down and select "New Applet".
4. Select "Location" as the trigger. This is the type of event that will cause your desired action to occur.
5. Choose "You exit an area".
6. Adjust the map so that your desired exit area is selected, then click "Save". This is the geofence that will trigger your action when you exit it.
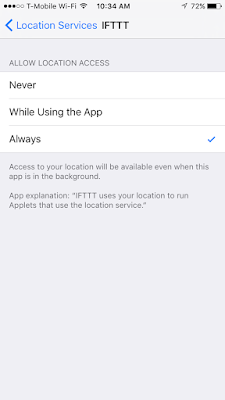
*Note that you will have to allow IFTTT to access your location at all times in order for any location-based recipe to work.
7. Select SMS as the action service, then select "Send me an SMS". This will allow the recipe to send an SMS to a number of your choosing whenever the trigger event (in our case, leaving a designating location marked by our geofence) occurs.
*Note that originally, the recipe will be configured to send to your phone number (assuming you have already provided IFTTT with it). To change this, simply click inside the applet and erase your phone number, then enter your desired phone number. You can also modify the rest of the recipe name as desired.
8. Click "Finish", then make sure your newly minted IFTTT recipe is on.
Congratulations, you now have a fully functional, location-based IFTTT recipe! Now test out the functionality by leaving your designated geofence area and see that your entered phone number receives an SMS.
I won't be leaving the area I designated until at least late afternoon today, so I'll post an update here with whether or not the recipe worked as well as a screenshot of the results.
Thanks for reading! My brief journey into IFTTT was enlightening, and I can forsee many opportunities to integrate IFTTT into future IoT projects. The next stage of my IoT journey will be delving into the expansive and exciting world of Arduino using internet capabilities. I plan to make my first post on this subject sometime in the next week or so (depending on when my supplies arrive), so be on the look out for my next post!
UPDATE: Here's the message my roommate received when I left the area:


