I recently purchased an AWS IoT Button (2nd generation), which can be found here for $20. This is basically a physical button that connects to wi-fi and easily integrates with AWS applications, especially Lambda.
To set up my button, I followed the process here. I opted for to download the iOS app to ensure the easiest setup process.
The first time I tried setting up the button, I couldn't connect it to wi-fi (so it was useless). I tried several different networks, to no avail. Seeing no other options, I gave it a rest and tried again the next day. With no apparent change to my network or setup process, the button connected as intended.
At the end of the mobile app-based setup process, I was prompted to set a Lambda function that will be executed when the button is clicked. I chose the preset function to send an SMS message using Python. (Note: This function will appear in your Lambda console and can be edited in any way.) I entered my cell phone number and desired message, then tested my button.
Viola! I received a text message from my button with the message I set. (I tested the button a few more times, just to make sure.)
Here's a video demonstration of my results:
This functionality may be simple, but I can imagine it being used in a variety of settings, from hospitals and hotels to restaurants and airplanes. More importantly, this exercise laid the foundation for me to create more complex functions in the future.
In many IoT (Internet of Things) projects, it is necessary to read from and write to a database. AWS has an application called DynamoDB that is a NoSQL database, exactly what we need. While it is very simple to add/modify/delete entries in this database via the user interface, it's not so obvious how to do so via HTTP API calls.
So, in this post I'll continue the AWS portion of my journey into IoT to learn how to do just that. I'll be following this tutorial.
The first thing I encountered is I wasn't sure if I was supposed to follow the steps under "Defining APIs", or if that was just knowledge for later. Turns out, that was knowledge for later. If I had any prior experience with APIs I probably would have realized this. Basically, the "API definition"s are just a high-level plan for what you want your API requests to look like in the end. In my opinion this information should go in the "Creating the APIs" section.
Moving through "Creating the DynamoDB Table", I experienced no trouble.
Under the subheading "Creating the Post Comments API", the instruction begins from what's called the "editor screen". There's a screenshot, but no indication of how to make that screen appear. I figured out that you must click "Actions" before you can select "Create Resource".
Similarly, the "Create Method" option is in this drop down, which is needed in the next step but the tutorial doesn't explain how to get there.
The tutorial also asks us to create an IAM role that "has permission to call the DynamoDB API PutItem for the Comments table", but doesn't explain how to do so. Looking at some other AWS documentation I took the following steps:
From the AWS Console, go to the IAM service.
Select "Policies" on the left panel.
Select "Create a Policy".
Choose "Select" by "Copy an AWS Managed Policy".
Choose "Select" next to "AmazonDynamoDBFullAccess"
Choose "Create Policy".
Honestly, I'm not sure if it's appropriate to use the AmazonDynamoDBFullAccess policy, but I don't know what else to use.
The next issue I ran into was that when I tried to test the API using the response body provided in the tutorial, I get a message with a response body of "internal server error". To verify that the request to post a new item didn't work, I navigated to the DynamoDB table and, sure enough, no item was added. Looking at the logs generated from the execution, I see "Execution failed due to configuration error: API Gateway does not have permission to assume the provided role". I suspect this an issue with the IAM role I assigned.
SOLUTION:
After scouring the internet for an answer, I finally resorted to post a question on Stackoverflow. After creating the policy as outlined above, you must take the following steps:
Go to "Roles" and click "Attach Policy".
Select the policy you just created and click "Attach Policy".
Copy the value of "Role ARN", located near the top of the page.
Go to your API in API Gateway and click the method you are working on (in my case, "Post").
Click "Integration Request".
Click the edit icon next to "Execution Role" and paste the role ARN inside.
Click the small check mark next to the text box, and you should be good to test your API.
Upon successful completion of a POST request, you should see Successfully completed execution near the bottom of the logs output. To verify that the request was successful, I went to my DynamoDB table and sure enough, a new entry had been inserted!
The GET request implementation went smoothly. Upon success, I received the following log output (partial):
Mon Sep 18 21:29:34 UTC 2017 : Endpoint request body after transformations: {
    "TableName": "Comments",
    "IndexName": "pageId-index",
    "KeyConditionExpression": "pageId = :v1",
    "ExpressionAttributeValues": {
        ":v1": {
            "S": "breaking-news-story-01-18-2016"
        }
    }
}
Mon Sep 18 21:29:34 UTC 2017 : Sending request to https://dynamodb.us-east-1.amazonaws.com/?Action=Query
Mon Sep 18 21:29:34 UTC 2017 : Received response. Integration latency: 32 ms
Mon Sep 18 21:29:34 UTC 2017 : Endpoint response body before transformations: {"Count":1,"Items":[{"userName":{"S":"Just Saying Thank You"},"message":{"S":"I really enjoyed this story!!"},"commentId":{"S":"test-invoke-request"},"pageId":{"S":"breaking-news-story-01-18-2016"}}],"ScannedCount":1}
That concluded the end of the tutorial.
Here is a video demonstration of my results:
Knowing how to perform GET and POST operations on a DynamoDB table will prove invaluable in the exploration of IoT. All sorts of data can be stored and retrieved by devices, available to query and analyze to unearth valuable insights about the world around us.
The first step I'm taking in my IoT journey is to learn about Amazon Web Services (AWS). Many IoT products utilize (or can utilize) this service, which is why it seems like a good starting place. Cloud computing is essential to IoT, since very little processing is done at the local level (hence: "internet").
If you aren't aware, AWS is a serverless platform that allows developers to run code, build databases, and much more all in the cloud. There are several advantages to using AWS:
frees developers and businesses up from having to administer to their own servers, since Amazon takes care of all server maintenance
virtually unlimited scaling, since AWS will dedicate more or fewer servers as needed for your data
only pay for the time when your code is called (in the case of AWS Lambda) -- not idle time
To get started, I followed these tutorials. They walk you through how to set up an AWS account and the AWS CLI (Command Line Interface), as well as how to use the Lambda, API Gateway, and DynamoDB services. All of these are basic services that will be essential in many IoT projects
After completing the first step in the tutorial (I already had an AWS account), I have the AWS CLI installed, which means I can use the Windows Command Prompt to efficiently perform AWS-related tasks. So far I've used it to configure an IAM (Identity and Access Management) role, configure my root account, and list all of the Lambda functions in my account. After completing the second step in the tutorial, creating a hello-world style Lambda function, I now understand the basics of working in the Lambda console. I can save and test function code, and modify and utilize key-value pairs as function input. I can also analyze the output of running a function. While completing the third step in the tutorial, creating a microservice using Lambda and API Gateway, I came across a couple of issues. First of all, I was confused about the part that says "create a DynamoDB table with streams enabled". While setting up the DynamoDB table, there didn't seem to be an option to enable streams. I simply saw this screen:
There's nothing about "streams" on there. Wanting to get my table set up correctly, I scoured the internet for a solution, to no avail. I finally decided to go ahead and click "Create", although I had no idea if my database would be set up properly. It was then that I realized that streams can only be enabled after creating the database. In the screen below, you have to click "Manage Streams"...
And then choose an option. Any option will enable streams, but beyond that more research may be required to determine which option will be best for your purposes. I left it at the default option.
Other than that, I didn't have any trouble following AWS's tutorial. However, the end was quite anti-climactic. It shows you how to send an HTTP GET request to your function by pasting the request in the test event configuration. The result was basically nothing, since I didn't have anything in my DynamoDB Table.
So, I decided to do some research to see how to insert new rows via HTTP requests. (You can also insert new rows through the user interface, but I thought doing so programatically may be more useful for IoT projects.) It appears this is the request syntax for updating a DynamoDB table. After attempting to use it, I've decided to make a subsequent post dedicated to that topic solely.
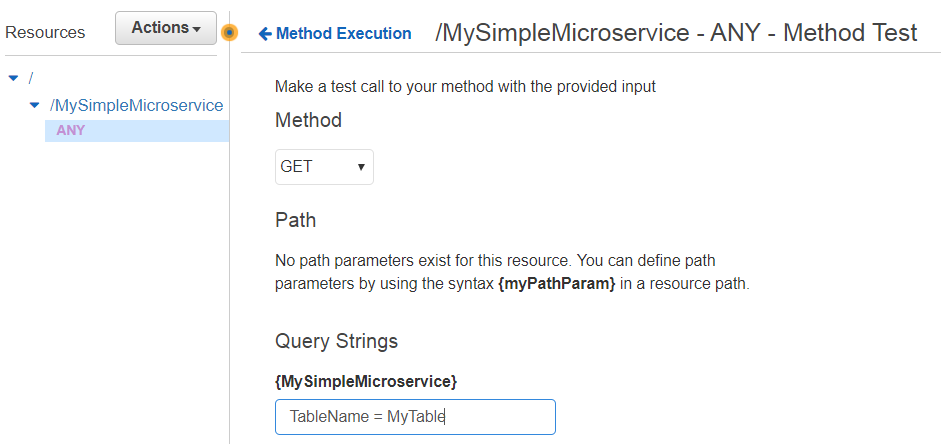
Another thing that didn't click for me at first was the role API Gateway played in the architecture. You can see the connection by going to the API Gatway console, selecting the ANY function, and clicking Test.
Then, choose the GET method (or whichever method you prefer; results may vary). In Query Strings, you can set any key-value pairs that your function uses. For example, I typed TableName = MyTable. Select "Test", and your API will call your Lambda function and show you the same output you would see testing it in the Lambda console.
Here is a video demonstrating my results:
Overall, I think this was a very successful first step for me into the world of IoT. I'll be able to use these basic AWS technologies in countless projects as I learn about the new tools we developers have at our disposal today.